
How to Get Started with Product Photography: Tips, Best Practices, and Examples
In today’s highly competitive ecommerce landscape, having professional product photography is more important than ever.
High-quality images not only showcase the best features of your products but also convey a sense of professionalism and trust to potential customers.
When users browse your online store, they rely on these visuals to make informed purchasing decisions, since they can’t physically examine the products themselves.
As a result, investing in top-notch product photography is essential to creating a strong brand identity and boosting your conversion rates.
Summary:
- High-quality product photography is essential for ecommerce success.
- You’ll need essential equipment to get started, including a camera, tripod, lights, and more.
- Learn the basics of pre-production, production, and post-production.
- Discover tips and tricks to improve your product photography.
- Explore real-life examples of exceptional ecommerce photography across different niches.
What you need to get started with product photography
Camera
First and foremost, you’ll need a reliable camera.
The best camera for product photography largely depends on your budget and requirements.
High-end DSLR and mirrorless cameras are typically the top choices among professionals, as they offer excellent image quality, versatility, and control over various settings.
These cameras allow you to change lenses, giving you the flexibility to capture different types of product shots with ease.
The best mirrorless and DSLR cameras
There are several great mirrorless and DSLR cameras that are well-suited for ecommerce product photography.
Here are some of the top options:
- Sony Alpha a7 III: This full-frame mirrorless camera boasts excellent image quality, fast autofocus, and a wide dynamic range, making it a great choice for capturing detailed product shots.
- Canon EOS 5D Mark IV: This professional-grade DSLR camera features a high-resolution sensor and advanced autofocus system. It’s ideal for shooting high-quality product photos.
- Nikon Z6 II: Another full-frame mirrorless camera, the Z6 II offers impressive low-light performance and a fast burst mode, allowing you to capture multiple shots of a product in quick succession.
- Fujifilm X-T4: This mirrorless camera is renowned for its film simulation modes, which can add a unique, vintage look to product photos. It also features a high-speed autofocus system and image stabilization technology, making it a versatile choice for product photography.
- Panasonic Lumix GH5: This mirrorless camera is a favorite among videographers, but it also excels at still photography, with a high-resolution sensor and fast autofocus system. It also offers 4K video recording, making it a good choice if you also need to capture product videos.
- Canon M50: The Canon M50 is another great option for ecommerce product photography. It is a mirrorless camera with a 24.1 megapixel APS-C CMOS sensor, a fast autofocus system, and a vari-angle touchscreen LCD. It also offers 4K video recording and built-in Wi-Fi and Bluetooth connectivity for easy file sharing.
However, it is entirely possible to use your smartphone camera for product photography, especially if you’re just starting out or have budget constraints.
Using an iPhone for product shots
Modern smartphones come equipped with high-quality cameras that can capture impressive images in the right conditions.
Some even offer advanced features such as portrait mode, which can create a shallow depth of field effect, and manual controls for adjusting exposure, focus, and other settings.
While a smartphone camera might not provide the same level of control and image quality as a dedicated DSLR or mirrorless camera, you can still achieve great results with proper lighting, composition, and post-processing.
Designated location
When it comes to ecommerce product photography, finding a designated location to set up your studio is essential.
You want to select a space that offers good lighting and enough room to work comfortably. This could be a spare room in your home, a garage, or any other space that you can transform into a studio.
When selecting your space, consider the amount of natural light that it receives
(unless you’re using artificial lighting).
Ideally, you want a space with plenty of natural light that can be diffused or reflected to create soft, even lighting. If you don’t have access to natural light, you can use artificial lighting to achieve a similar effect.
Background
A seamless or plain background helps keep the focus on your products.
Choose a solid color, such as white or light gray, to minimize distractions and create a professional look.
You can create a solid color or seamless background for your ecommerce product photos by using a physical backdrop such as a large sheet of white paper or fabric.
Alternatively, you can create a digital background using photo editing software like Canva, Photopea, or Photoshop to create a solid white background or add color and texture with the gradient and texture tools.
The method you choose depends on your budget, the look you’re trying to achieve, and your level of expertise with photo editing software.
If you sell smaller products, you can also try an all-in-one mini photo studio light box.
Tripod
A sturdy tripod is essential to ensure your camera stays steady and you frame your shots properly.
Invest in a quality tripod to avoid blurry images and achieve consistent results.
Bounce board
A bounce board (or diffusion board) is used to reflect or diffuse light onto your subject, helping eliminate harsh shadows and create more even lighting.
You can purchase one or make your own using a large piece of white foam board.
Shooting table
A shooting table provides a stable surface to display your products while also making it easier to adjust and style them.
Choose a table that’s the right size for your products and offers adjustable height options.
Setup accessories
Finally, gather various setup accessories such as tape, clamps, and hooks to help secure your background and other elements in place.
These items will make your product photography process smoother and more efficient.
Suggested Reading: Product Photography 101: How To Produce The Best Product Photos
The basics of diffusion, reflection, and soft vs. hard lighting
You don’t need to be a pro photographer to get high-quality photos, but understanding some basic lighting concepts will improve your product photography, even if you’re just starting out.
One thing you’ll quickly realize is that successful product photography often depends far more on your lighting than your actual physical camera.
Poor lighting with the highest-quality camera will still result in an amateurish product photo.
Here are some important concepts to keep in mind:
Diffusion
Diffusion is the process of spreading light over a larger area, reducing harsh shadows and creating a more even illumination.
This can be achieved using various materials, such as translucent fabric or paper, which are placed between the light source and the subject.
Diffusion is essential in product photography, as it helps create a softer, more flattering light that highlights the product’s details without causing harsh shadows or reflections.
Reflection
Reflection plays a significant role in product photography, as it can help fill in shadows, enhance details, and create a sense of depth.
By using reflectors or bounce boards, you can redirect light from your primary light source onto specific areas of your product.
Reflectors come in different colors, such as white, silver, or gold, each providing a different effect on the reflected light.
White reflectors produce a neutral, soft fill light, while silver and gold reflectors create a stronger, more contrasting fill light with a cool or warm tone, respectively.
Soft light vs. hard light
Understanding the difference between soft and hard lighting is crucial for achieving the desired look in your product photos.
Soft lighting is characterized by gradual transitions between light and shadow, creating a more pleasing and natural appearance.
This type of lighting is achieved by using large light sources, diffusers, or placing the light source further away from the subject.
Soft lighting is often preferred in product photography, as it helps bring out the textures and details of the product without causing harsh shadows or glare.
On the other hand, hard lighting produces sharp, defined shadows and a more dramatic look.
It is created by using small, direct light sources or placing the light source close to the subject.
While hard lighting can be useful in certain situations, such as emphasizing specific features or creating a more dramatic effect, it can also result in unflattering, harsh images if not used carefully.
By mastering these basic lighting concepts, you’ll be well on your way to capturing professional-quality product photos that showcase your products in their best light.
Remember, investing time and effort into understanding and perfecting your lighting setup can make all the difference in your final images, regardless of the camera you use.
The classic 3-point studio lighting setup
In a professional photo studio, one of the most popular and versatile lighting setups for product photography is the classic 3-point studio lighting arrangement.
This setup consists of three primary lights: the key light, the fill light, and the back or rim light.
By using these three types of lights in conjunction, you can create a well-lit, dynamic, and professional-looking product photography studio environment that enhances your products’ visual appeal.
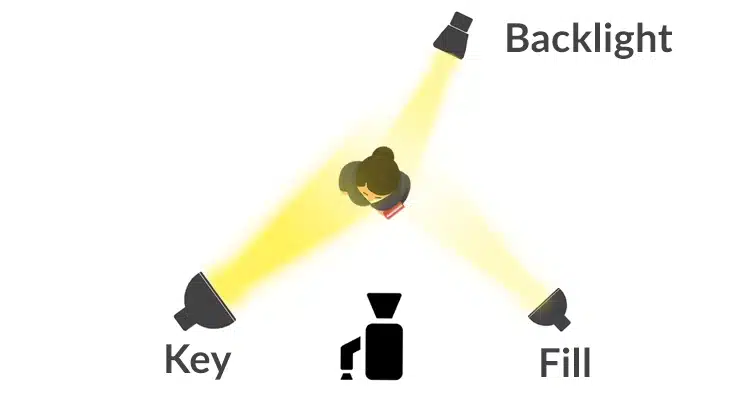
Key light
The key light, also known as the main light, is the primary light source in your product photography lighting setup.
It sets the overall tone, mood, and direction of the lighting in your scene.
The key light is usually placed at a 45-degree angle to the subject and slightly above its height, creating a balanced, natural lighting effect that accentuates the product’s shape and texture.
The intensity and size of the key light can be adjusted to create various effects, from soft, diffused light to more dramatic illumination with clear contrast.
Fill light
The fill light is used to soften the shadows created by the key light, ensuring more even and balanced lighting across your product.
Positioned opposite the key light and at a lower intensity, the fill light helps to reveal details in the shadow areas and reduces unwanted contrasts in your product photography.
By adjusting the fill light’s intensity and distance, you can control the level of shadow and create a more natural, flattering look in your product images.
Back or rim light
The back or rim light, sometimes called the hair light or separation light, is the third light source in the 3-light studio setup.
Positioned behind the subject and aimed towards it, this light is used to create a subtle glow or highlight along the edges of the product, separating it from the background and adding depth to the image.
The back or rim light can also be used to emphasize specific features of the product or create a more dramatic, eye-catching effect in your product photography studio.
By mastering the classic 3-light studio lighting setup, you can create a professional and dynamic product photography lighting environment that showcases your products in their best light.
Understanding the roles and interactions of the key light, fill light, and back or rim light will allow you to experiment with different lighting effects and styles, helping you achieve the perfect look for your product images.
The process of product photography for beginners
Setting up the product for photographing
Styling your product
Take the time to style your product thoughtfully, paying attention to details such as arrangement, positioning, and the use of props.
Set up the reflector card
Place the reflector card opposite your light source to bounce light onto your product.
This simple yet effective technique helps fill in shadows and create more even lighting.
Capturing product photos
Take multiple exposures
Don’t settle for just one shot.
Capture photos from multiple angles, so you can choose the best images later during the editing process.
Capture your product in multiple contexts
In the realm of ecommerce and product photography, variety is key. To showcase your product’s value and versatility, it’s essential to capture it in multiple contexts.
This includes close-up shots, images from different angles, and the product “in action.”
By providing a diverse visuals, you can ensure that potential customers have a comprehensive understanding of your product’s features and benefits.
Close-up shots
Close-up shots are crucial for highlighting the finer details and craftsmanship of your product.
You can focus on specific aspects or unique selling points, and create a stronger impression on your target audience.
These images allow customers to inspect your product more closely, so they can have confidence in its quality and design.
Shots from different angles
Variety is essential when it comes to product photography, and showcasing your product from different angles can provide a complete picture of its overall appearance.
Including images from various perspectives helps potential customers understand the product’s dimensions, shape, and functionality.
By offering a comprehensive view, you ensure that your audience has all the information they need to make an informed decision.
The product “in action”
Lifestyle photos or lifestyle shots are an excellent way to demonstrate your product in real-life situations.
These images depict your product being used or enjoyed in a relevant context, helping potential customers envision how it would fit into their own lives.
Including lifestyle photos in your product photography not only adds variety to your visual presentation but also helps create an emotional connection between your customers and your product.
By capturing your product in multiple contexts, you can create a well-rounded and engaging visual experience for your potential customers.
Post-production photo editing
Use photo editing software
Invest in quality photo editing software to enhance your product images.
Popular options include Adobe Photoshop and Lightroom, as well as more budget-friendly alternatives like Affinity Photo or the browser-based Photoshop clone Photopea.
Retouch your pictures
Take the time to retouch your photos, removing any blemishes, adjusting colors, and making other necessary edits to create a polished final image.
Optimize images for your website
Optimizing your product images for your website is crucial to improving page speed and overall site health.
Most photo editors have a web-friendly export format. As a good rule of thumb, try to keep your photo sizes under 200 kb per photo.
Create consistent editing
Maintain consistency across your product images by applying the same editing style and techniques to each photo.
This helps reinforce your brand identity and creates a cohesive visual experience for customers.
Suggested Reading: 9 Questions You Need To Ask About Your eCommerce Website.
Product photography tips
Lighting and composition
Natural lighting
Natural light is a budget-friendly option that can produce beautiful results.
Use window light or shoot outdoors to take advantage of the soft, even illumination provided by the sun.
Artificial light
Artificial light, such as studio lights or even household lamps, offers more control and consistency compared to natural light.
Experiment with different light sources to find the best option for your products.
Light tent
A light tent is a wireframe box with transparent walls designed to create uniform illumination for the object being photographed.
Consider using one to help achieve professional-looking product images.
Composition
Experiment with various composition techniques, such as front and cropped shots, flat lays, and the rule of thirds, to create visually interesting and engaging product photos.
Again, you can’t go wrong with analyzing the competition to see what’s trending in your industry.
Focus and depth of field
Pay close attention to focus and depth of field when shooting your products.
Ensure the product is sharp and in focus while maintaining a pleasing background blur to help the product stand out.
Suggested Reading: Your eBay Store: Design, Marketing And Branding
Advanced techniques to elevate your product photography
Mastering different lighting techniques
Experiment with various lighting techniques, such as Rembrandt lighting, split lighting and butterfly lighting to add depth and dimension to your product images.
Experimenting with unique and creative angles
Don’t be afraid to get creative with your camera angles.
Try shooting from above, below, or even incorporating diagonal angles to create dynamic and eye-catching product photos.
Using macro photography for detailed shots
Capture the intricate details of your products using macro photography.
This technique involves photographing small subjects at close range, resulting in stunning, detailed images that highlight the unique features of your products.
Harnessing the power of photo stacking for maximum sharpness
Photo stacking is a technique used to combine multiple images taken at different focus distances, creating an image with a greater depth of field.
This can be particularly useful for product photography, ensuring that every part of your product is sharp and in focus.
Suggested Reading: How To Attract New Customers For Your Ecommerce Business
Real-life examples of excellent ecommerce photography across various niches and categories
Apparel and fashion
Fashion ecommerce photography often features models wearing clothing or accessories, as well as flat lays and detail shots.
Check out well-known brands like ASOS and Zara for inspiration.
Beauty and skincare
Skincare and beauty product photography typically showcases the product packaging along with close-ups of textures and ingredients.
Brands like Glossier and Fenty Beauty provide great examples.
Electronics and gadgets
Photography for electronics and gadgets often focuses on the product’s sleek design and functionality.
Take a look at Apple and Samsung for some excellent photography inspiration.
Home and kitchen
Home and kitchen product photography should highlight the product’s design and practicality.
Brands like IKEA and Crate & Barrel offer beautiful examples of this type of photography.
Jewelry and accessories
Jewelry and accessory photography should emphasize the product’s unique features and details.
Tiffany & Co. and Swarovski provide excellent examples of stunning jewelry photography.
Sports and fitness
Sports and fitness product photography often includes action shots and close-ups of the product in use.
Nike and Adidas are great sources of inspiration for this category.
Toys and games
Toys and games photography should showcase the product’s fun and engaging aspects while also highlighting key features.
Hasbro and LEGO offer excellent examples of this type of photography.
Hiring a professional product photography service
If you’re struggling to achieve the desired quality for your product images or simply don’t have the time to invest in photography, it might be time to consider hiring a professional product photographer (or a professional service).
Check out Soona for a reasonably priced photography-as-a-service platform.
Product photography FAQs (Frequently Asked Questions)
What is the goal of product photography?
The goal of product photography is to create visually appealing and informative images that showcase a product’s features, benefits, and overall value to potential customers.
What type of equipment do I need for product photography?
You’ll need a camera, tripod, lights, background, shooting table, bounce board, and various setup accessories to get started with product photography.
What is the best way to light product photography?
There is no one-size-fits-all answer, as the best lighting setup depends on the product and the desired outcome.
Experiment with natural light, artificial light, or a combination of both to find the optimal lighting for your product images.
How do I compose my product photography shots?
Compose your shots using various techniques, such as front and cropped views, flat lays, and the rule of thirds.
Consider using simple props or backgrounds to add interest without distracting from the product itself.
What tips can I follow when photographing products?
- Use proper lighting and composition techniques.
- Focus on the product and maintain a consistent depth of field.
- Experiment with different camera angles and settings.
- Retouch and optimize your images during post-production.
- Pair your images with well-written product descriptions.
What are some best practices for food photography?
- Use natural light whenever possible, as it can make the food appear more appetizing and natural.
- Choose a simple background that complements the dish without being distracting.
- Style your food to make it look fresh and appealing, using garnishes, colorful ingredients, and a clean presentation.
- Experiment with different angles, such as overhead shots, 45-degree angles, or close-ups, to find the most visually appealing perspective for each dish.
- Use depth of field to your advantage, focusing on specific elements of the dish while leaving the background slightly blurred.
- Incorporate props, such as utensils, napkins, and ingredients, to create context and tell a story around the dish.
- Edit your photos carefully, adjusting colors, contrast, and sharpness to make the food look its best without appearing unnatural.
What are the best camera settings for product photography?
The best camera settings for product photography can vary depending on the specific product, lighting conditions, and desired outcome.
However, there are some general guidelines you can follow to achieve high-quality product photos:
- Aperture: Aim for a smaller aperture (higher f-number) like f/8 or f/11 to ensure a greater depth of field and keep the entire product in focus (unless you’re going for a more artistic, shallow-depth-of-field look).
- Shutter Speed: Use a slower shutter speed, such as 1/100 or 1/200, to capture more detail and minimize motion blur. A tripod is essential when using slower shutter speeds to prevent camera shake.
- ISO: Keep the ISO as low as possible (e.g., 100 or 200) to minimize noise and maintain image quality. Adjust your lighting to compensate for the low ISO if needed.
- White Balance: Set your white balance to match your lighting source (e.g., daylight, tungsten, or fluorescent) for accurate color reproduction.
- File Format: Shoot in RAW format to capture more data and allow for greater flexibility during post-processing.
Keep in mind that these settings are only a starting point and may need to be adjusted based on your specific situation.
Experiment with different settings and review your photos to determine which combination produces the best results for your product photography.
Suggested Reading: How To Optimize Your eCommerce Customer Experience To Drive Sales.
Final thoughts
Product photography is a crucial aspect of ecommerce success, as high-quality images can significantly impact customer perception and trust, increasing conversions and sales.
Thanks to the wealth of resources on the internet (and the quality of smartphone cameras and consumer DSLRs), you can achieve professional product photography without actually hiring a professional photographer.
By following the tips and best practices outlined in this guide, you’ll be well on your way to creating captivating product images that showcase the true value of your offerings.
So grab your camera and start shooting!