
How to start a Shopify store in 11 simple steps (the ultimate guide for 2026)
Table of Contents

See Linnworks & Shopify in action

If you’re reading this, you’ve probably been dreaming of starting your own Shopify store for years, but you’ve been putting it off.
Maybe it’s because you’re not sure where to start, or you’re overwhelmed by the number of choices out there.
Whatever the reason, you’re not alone. Starting an online store can be intimidating, especially if you don’t have any experience in ecommerce.
Allow us to help.
In this guide, we’ll walk through how to start a Shopify store in 11 simple steps—the ultimate Shopify tutorial for 2026—from choosing your niche and products to launching your store and promoting it.
It is absolutely possible to turn that dream of owning your own online store into a reality.
So, whether you’re a small business looking to expand the places you sell online or a budding entrepreneur with a great idea, this guide is for you.
Find Your Next Marketplace Quiz
Want to see what marketplaces are the perfect fit for your business? This interactive quiz calculates your ideal marketplaces based on your specific operational conditions. Find your next big audience now!

Step 1: Choose your niche and products
The first step in starting your Shopify store is deciding what products you want to sell and the niche you want to target.
To make the best decision, consider the following factors when choosing your niche and products:
Market demand and competition
Research the current market to understand which product listings are in high demand and evaluate the competition within your chosen niche.A good way to verify the demand of a particular niche is to type it into Google Trends . This will show you the popularity of whatever you’re selling over time. For example, remember fidget spinners? They were all the rage (until they weren’t). Check out the Google Trends graph of the popularity of fidget spinners:
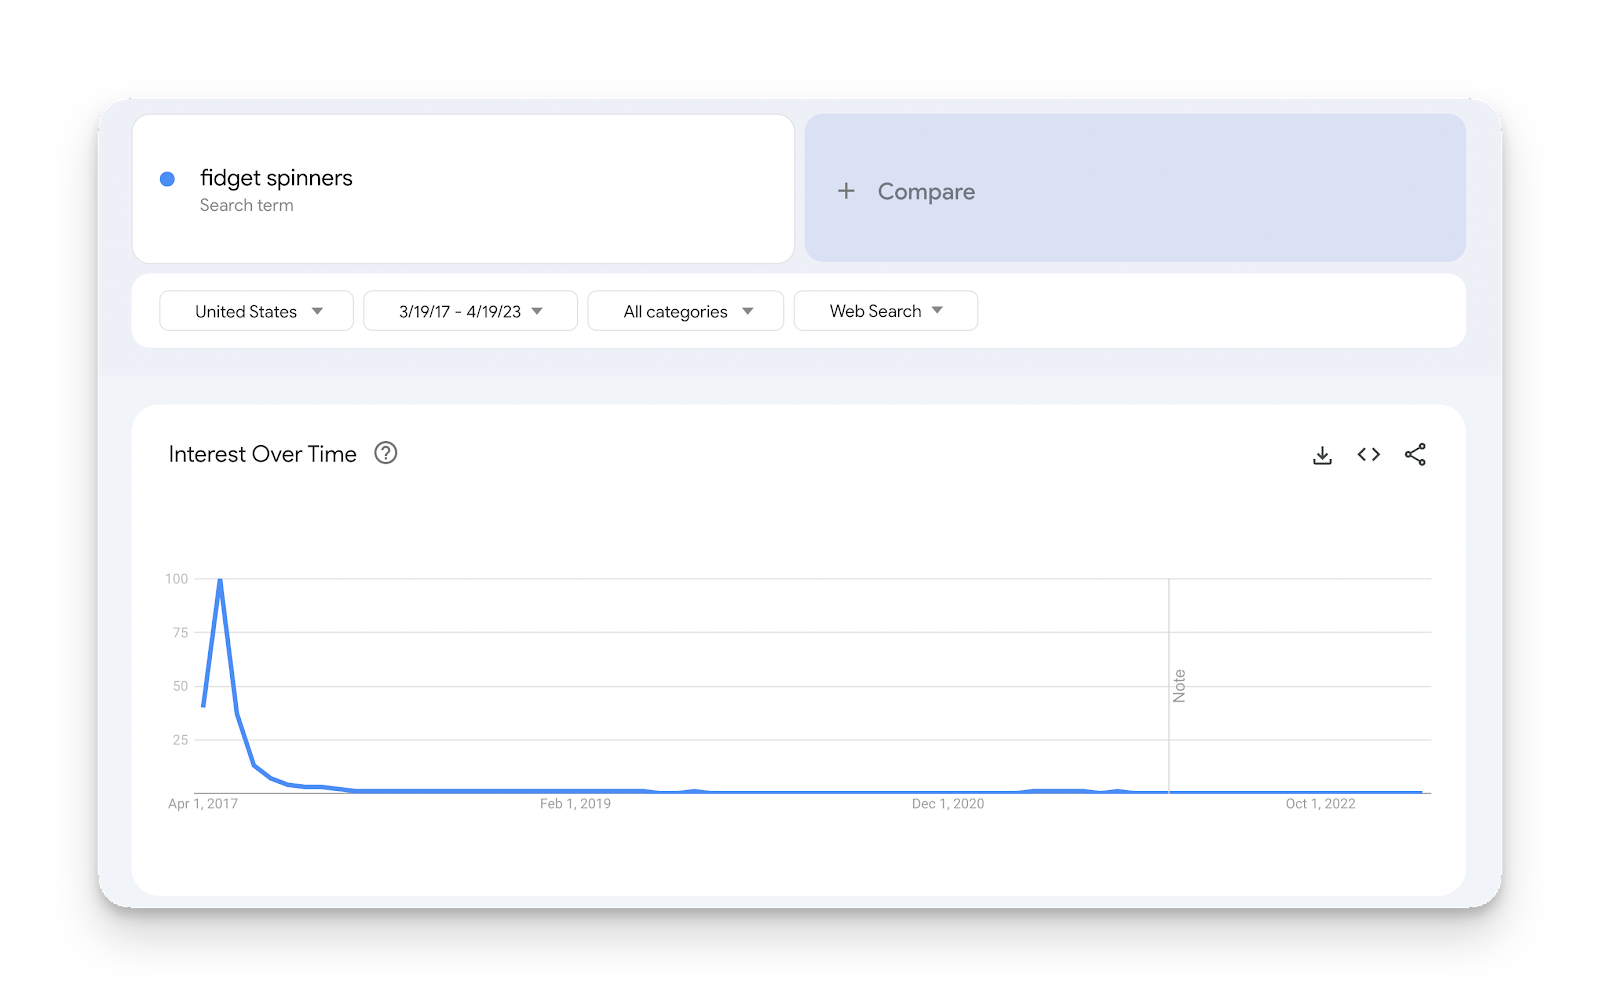
Not great.
Choosing a niche is a challenging balance. On one end, you want to ensure that there is enough demand for your products, but not so much competition that it’s difficult to stand out to the potential customer.
Your passions and interests
Selecting a niche that aligns with your personal interests will make running your ecommerce business more enjoyable and increase your chances of success.
It’s easier to stay motivated and knowledgeable about your products when you’re passionate about the niche (or already run a brand that can sell products in a particular niche).
The potential for profit and growth
If you have access to supplier costs, analyze the profit margins of the products you plan to sell and the potential for growth within your niche.
Ensure that the niche you choose has the potential for long-term growth and profitability. Some of this takes a bit of gut-level guesswork, but generally speaking, “evergreen” niches are your best friend.
Things like:
- Health
- Relationships
- Money
- Beauty and skincare
- Pet care
These are highly resilient niches that will likely never go away and thus perfect candidates for Shopify merchants. Take the time to research your chosen niche and identify any gaps in the market where your store can stand out.
Look for underserved niches or unique product offerings that can differentiate your store from the competition. Here are a few specific ways you can conduct niche research:
- Keyword research: Use keyword research tools like Google Keyword Planner, Ahrefs, or SEMrush to find popular search terms related to your niche. Analyze the search volume and competition for these terms to determine if there’s demand for your product ideas.
- Competitor analysis: Investigate your potential competitors by browsing their websites and online stores. Take note of their product offerings, pricing and branding. Look for any gaps or opportunities to differentiate your store from theirs.
- Social media research: Browse social media platforms like Instagram, Pinterest and Facebook to identify popular trends, products and influencers within your niche. Pay attention to the engagement on related posts to gauge consumer interest in specific products or trends.
- Online communities: Join niche-specific forums, Facebook groups, or Reddit communities to gain insights into the needs and desires of your target audience. Participate in discussions, ask questions and gather feedback to help refine your product ideas
- Trend analysis: Stay up-to-date with industry news and trends by following relevant blogs, magazines and podcasts.
- Product reviews: Read customer reviews on marketplaces like Amazon, eBay, or Etsy to identify common pain points, unmet needs, or potential improvements for products within your niche. Use this information to offer better solutions or unique product features that can set your store apart (pay special attention to the negative or 1-star reviews!).
By conducting thorough niche research and identifying gaps in the market, you can develop a unique value proposition for your store that appeals to your target audience and differentiates you from the competition.
You can even combine two niches together to “niche down” even deeper.
For example, if you have a passion for eco-friendly products and notice a growing demand for sustainable clothing, you could start a new Shopify store focused on selling ethically-made apparel.
By offering a curated selection of eco-conscious brands or designing your own sustainable clothing line, you can cater to a specific audience that has an interest in both fashion and eco-friendly commerce.
By choosing a niche that aligns with your interests and has market potential, you’ll be more motivated to grow your ecommerce business and better positioned to succeed.
Once you’ve decided on your niche and products, it’s time to move on to the next step.
Related Post: How to Find Profitable Products to Sell Online
Step 2: Sign up for a Shopify account
To create your store, you’ll need to sign up for a Shopify account. Visit the Shopify website and click “Start free trial” to begin the signup process.

You’ll be prompted to enter your email address, create a password and choose a store name. Keep in mind that your store name will also be your default Shopify domain name (e.g., yourstorename.myshopify.com), so choose something that represents your business idea and brand well. As you brainstorm your business name, consider checking out existing Shopify stores for inspiration and ideas on how to create a memorable and unique store name.
After completing the signup process, you’ll land in your Shopify Admin dashboard (sometimes called the Shopify Dashboard or admin panel) where you activate Shopify Payments or another gateway and pick a Basic Shopify plan before customizing your store.
One of the first steps in setting up your store is to purchase a custom domain that reflects your new business (and yes, starting a Shopify store is pretty much like starting a new business) and is easy for customers to remember. Having a custom domain not only looks more professional but also helps with search engine optimization (SEO), making it easier for potential customers to find your store online. In addition to a custom domain, consider the overall design and layout of your store, as well as the features and functionality that you want to offer.
Shopify offers a wide range of themes in the Shopify Theme Store, from free starter layouts to premium options created by approved Shopify Partners and Shopify Developers.
Take the time to explore the available options and select a theme that best aligns with your brand and business goals. Note that you can change your theme at any time and we’ll get deeper into the nuances of themes in the next section.
Once you have your domain and theme in place, you can begin adding products, setting up payment gateways and configuring shipping options, among other tasks that will help you create a fully functional ecommerce store.
Related Post: How does shopify work for ecommerce?
Step 3: Choose a Shopify theme and customize your online store
A visually appealing online store can make a significant difference in attracting customers and driving sales. Shopify offers a wide range of themes, both free and paid, that you can use to customize the look of your store.
You can also hire a developer on a site like Upwork to design a Shopify theme from scratch. But if you’re just starting out, Shopify’s boilerplate themes are still fantastic. To choose a theme, navigate to the “Online Store” section in your Shopify admin dashboard and click on “Themes.”
Browse the available themes and select one that suits your brand and niche.
Considerations when choosing a theme
When going through the Shopify setup, choosing the right theme can make a significant impact on the success of your ecommerce business.
Shopify offers both free and paid themes and it’s important to consider the following when making your decision.
Paid themes vs. free themes
While free themes work for a lean launch, most growing Shopify businesses eventually upgrade to a paid theme—or even Shopify Plus—for deeper flexibility and performance. Paid themes may also provide better support, security and regular updates. And of course, paid themes have a higher barrier to entry, meaning you likely won’t see many other Shopify stores with your theme floating around the internet.
Niche-specific themes
Some themes are designed specifically for certain niches, such as fashion, beauty, or home goods. If you happen to already set up your products and website copy, you can actually preview what your site would look like using a given theme. Then, you can navigate the site as a user would.
Customizing your theme
Customizing your theme is an essential step in creating a unique and professional-looking online store. Shopify offers a wide range of customization options that allow you to tailor your theme to your brand’s specific needs.
One of the easiest ways to customize your theme is through the Shopify Theme Editor, which can be accessed from your Shopify admin dashboard. This editor allows you to modify your theme’s layout, typography, colors and more, using a simple drag-and-drop interface.
For more advanced customizations, you can edit your theme’s code directly using HTML, CSS and JavaScript. This requires more technical knowledge but can provide greater control over your store’s design. Keep in mind that some themes may have limitations on the amount of customization allowed. Paid themes often offer more advanced customization options, while free themes may have more limited options.
Make sure to explore the Shopify Theme Store to find a theme that offers the level of customization you need.
The importance of a well-designed store
A well-designed store does so much. It engenders trust, increases sales through good user interface design and helps your customers associate your brand with a positive and pleasing buying experience. Invest time in crafting a visually appealing, easy-to-navigate store that reflects your brand identity and makes your customers feel comfortable and confident when shopping with you.
If you’re not a designer or aesthetically-minded person, we recommend running your design by some friends, colleagues, or even other Shopify store owners and getting their opinions. Reach out to folks in your niche and ask them for feedback. As a side note, networking with people in your niche is always a good idea. By paying close attention to design details and prioritizing user experience, you’ll set the stage for a successful ecommerce store that can attract and retain loyal customers.
Once you’ve gotten your theme squared away, you’re almost ready to launch your site and start selling.
Related Post: 100 Best Shopify Stores for Ecommerce Inspiration
Step 4: Add your products
Now that you’ve chosen a theme and customized your store’s appearance, it’s time to add product listings.
For the sake of time, we are assuming you’ve:
- Decided on your niche
- Identified a target market for your products
- Sourced products (or are in the process of sourcing products) from a supplier
Product sourcing is a topic that deserves a blog post all its own, so be sure to check out our guide on how to find high-demand & profitable products to sell after you read this article.
In your Shopify admin dashboard, navigate to the “Products” section and click “Add product.”
Required product information
For each product page, you’ll need to enter the following information:
- Product title
- Product description
- Price
- Images
- Inventory and shipping details
Make sure to provide accurate and detailed product information to help your customers make informed purchasing decisions.
Importance of high-quality images
If there’s one thing you take away from this guide, let it be this: high-quality product photos will make or break your online store.

Go look at the average ecommerce store. What do you see? 90% of the visible space on the site is likely product photos. We’d even go so far as to say that if you don’t have professional, high-quality product photos, you’re better off not having photos at all. The risk of turning off potential customers from your brand is just too great.
If you don’t want to take your own product photos, you can invest in something like Soona. Soona (and other brands like it) are really handy services that receive your products, take a series of professional photos and then send you the results.
It’s essentially a completely outsourced, remote photographer-for-hire. Genius.
So, we’ll say it again for the people in the back: high-quality product photos will make or break your online store. Don’t neglect this crucial aspect of your online store.
Product descriptions and SEO
When crafting a compelling product description, remember it informs customers and strengthens your store’s SEO. Shopify SEO looks for relevant keywords and phrases in your descriptions to help potential customers find your products through its search engines. You can even use Shopify Magic, the platform’s AI tool, to help write these descriptions faster.
If you followed the above step of doing keyword research for your niche, you should already have an idea of the types of things your target audience searches for. When using Shopify, your product descriptions are often what shows up in the search engine listing preview, so make sure they’re both descriptive and eye-catching.
Organizing your products
To make it easier for customers to find and browse your products, organize them into logical categories and collections.
This can be done in the “Collections” section of your Shopify admin dashboard, where you can create custom groupings based on product type, price, or any other criteria you choose.
Importance of navigation
By carefully organizing and presenting your products, you’ll create a more user-friendly shopping experience and increase the likelihood of customers making a purchase. A clear and intuitive navigation structure is essential for helping customers find what they’re looking for quickly and efficiently.
Using tags and filters
In addition to creating collections, consider using tags and filters to further refine your product organization. Tags can be used to label products with specific attributes, such as color or material, while filters allow customers to sort and view products based on these attributes.
Implementing these features can greatly improve the overall user experience on your site and encourage customers to explore your product offerings more thoroughly.
Collection images and descriptions
Don’t forget to add appealing images and informative descriptions to your collections as well. These elements can help communicate the theme or purpose of each collection and entice customers to click through and explore the products within.
By investing time and effort into organizing your products and optimizing your store’s navigation, you’ll create a more enjoyable shopping experience for your customers and ultimately increase the likelihood of making a sale.
Related Post: Selling on Shopify: Tips to Grow Your Online Store
Step 5: Set up your payment gateway
After choosing a theme and customizing your store’s appearance, the next step to setting up your Shopify store is to configure your payment gateway. Payment gateways are essential for processing transactions and accepting payments from your customers. Shopify supports many payment gateways—including Shopify Payments (which unlocks Shop Pay one-click checkout), PayPal and Stripe —giving Shopify merchants flexible payment options.
To set up your payment method, go to the “Settings” section in your Shopify admin dashboard and click on “Payments.” Shopify Payments is the default option and it’s easy to set up if you’re located in a supported country.
If you prefer to use a third-party payment gateway like PayPal or Stripe, you’ll need to follow the instructions provided to connect your account to your Shopify store. Make sure to choose a payment gateway that meets your business needs and offers the payment options your customers prefer.
It’s also essential to consider the transaction fees associated with each payment gateway. Some payment gateways charge higher fees than others, so do your research to find the best option for your business.
For example, Stripe is a very flexible payment gateway that supports multiple payment locations, including a 3rd-party website and even social media platforms. However, you’ll cough up an extra 1%-2% per transaction if you opt for Stripe over Shopify Payments (at the time of this writing).
And of course, make sure to test your payment gateway by going through the entire buying cycle before you launch your store.
Related Posts:
Step 6: Configure your shipping settings
Shipping is an essential aspect of any ecommerce business, as it directly impacts customer satisfaction and your profit margins.
In your Shopify admin dashboard, go to “Settings” and click on “Shipping and delivery” to configure your Shopify shipping settings.
Setting up shipping zones
Here, you can set up shipping zones, which are geographical areas where you offer shipping services.
Each zone can have its own shipping rate and delivery options, allowing you to tailor your shipping strategy to different regions and customer preferences. If you’re not using a 3PL or Fulfilled by Shopify (we’ll talk more about that later in the post), it may not be profitable for you to ship your products to certain parts of the country.
(For example, if you’re on the East Coast shipping heavier, bulkier products to the West Coast.)
Configuring shipping rates
Next, configure your shipping rates for each zone. You can offer flat-rate shipping, which charges a fixed fee regardless of order size, or calculated shipping rates based on factors like weight, order total, or destination.
It’s important to strike a balance between covering your shipping costs and offering competitive rates to attract customers.
Offering delivery options
In addition to setting shipping rates, you can also offer various delivery options, such as standard, expedited, or overnight shipping.
Providing customers with multiple shipping choices can help accommodate different needs and preferences, ultimately improving the overall shopping experience.
Using shipping apps and integrations
Consider using third-party tools from the Shopify App Store—or an all-in-one platform like Linnworks—to streamline your Shopify shipping workflows. These tools can help you automate shipping label creation, track packages and manage returns more efficiently.
Or, even better, consider an all-in-one inventory management and warehouse management platform like Linnworks, which seamlessly integrates with Shopify.
Evaluating carrier options
Compare carriers like UPS, FedEx, and USPS to determine which one offers the best rates and services for your specific needs.
By carefully configuring your shipping settings and considering your customers’ needs, Shopify merchants can create a positive shopping experience while protecting profit margins.
Step 7: Set up taxes
As an ecommerce store owner, you’ll need to ensure that you’re charging the appropriate taxes on your products. Shopify makes it easy to set up tax settings for your store.
In your Shopify admin dashboard, go to “Settings” and click on “Taxes” to manage your sales tax configurations.
Configuring tax settings based on location
From here, you can configure your tax settings based on your location and the tax rules that apply to your business.
Shopify can automatically calculate taxes for you based on store and customer locations—a huge time-saver for small-business merchants running multiple Shopify stores. Or you can also set up custom tax rates for specific regions if needed.
Adding tax exemptions
In some cases, certain products or customers may be exempt from taxes.
Shopify allows you to create tax exemptions for specific products or customer groups, ensuring that you only charge taxes where applicable.
Researching local tax laws
Be sure to research your local tax laws and consult with a tax professional if necessary to ensure that you’re charging the correct amount of tax on your products.
Different countries, states and municipalities may have different tax rates and rules, so it’s important to stay informed and up-to-date on any changes.
Collecting and remitting taxes
Once your tax settings are configured, Shopify will automatically add the appropriate taxes to your customers’ orders during checkout. It’s your responsibility to collect and remit these taxes to the appropriate tax authorities, so be sure to keep accurate records and file your tax returns on time.
By properly setting up your tax settings and staying informed about local tax laws, you can ensure that your ecommerce store remains compliant and avoids any potential legal or financial issues.
Step 8: Create essential pages for your store
Your Shopify store should include several essential pages to provide important information to your customers and comply with legal requirements.
Some of the key pages you should create include:
About Us
An About Us page helps customers understand your brand’s story, mission and values. Share information about your company’s background, the inspiration behind your products and any unique selling points that set you apart from competitors.
Contact Us
Nothing frustrates consumers more than a Shopify store owner with a hidden address. Make it easy for your customers to reach you so that you can provide excellent customer service. A Contact Us page provides customers with a way to reach out to you for any questions, concerns, or feedback.
Include your contact information such as email address, phone number and physical address (if applicable), as well as a contact form for easy communication. Also, provide the customer with contact expectations (getting back to them within 24-48 hours, for example).
Shipping & Returns
A Shipping & Returns page informs customers about your shipping policies, delivery times and return procedures. Clearly outline the shipping rates, estimated delivery times and any special shipping options you offer, as well as your refund policy and rules.
Privacy Policy
A Privacy Policy is a legal requirement for most ecommerce stores and helps build trust with your customers. This page should explain how your store collects, uses and protects customer data, including personal information and payment details.
Terms of Service
A Terms of Service page outlines the rules and guidelines that customers must agree to when using your online store. This includes information on payment methods, order cancellations and any other terms that govern the use of your site.
Similar to the Privacy Policy, you can use a template or seek legal advice to create a comprehensive Terms of Service for your store.
Creating your pages
To create these pages, go to your Shopify admin dashboard and click on “Online Store,” then “Pages.” Click “Add page” to create each page, adding relevant content and formatting it to match your store’s design.
By including these essential pages on your Shopify store, you’ll provide a better user experience for your customers and ensure that your store is legally compliant.
Step 9: Install useful Shopify apps to enhance your ecommerce store
Shopify offers a wide range of apps that can help you enhance your store’s functionality, streamline your operations and boost sales.
Some popular Shopify apps include:
SEO tools
SEO tools can help you improve your store’s search engine rankings, making it easier for potential customers to find your products online. You can also integrate Google Analytics here for deeper data visibility.
Some examples of SEO apps include Plug in SEO and SEO Manager.
Email marketing apps
Email marketing apps help you build your mailing list and communicate with customers through targeted email campaigns.
Some popular email marketing apps include Klaviyo and Omnisend.
Inventory management apps
Inventory management apps allow you to keep track of your stock levels and automate order fulfillment, helping you maintain optimal inventory levels and reduce the risk of stock-outs or overstocking.
Some examples of inventory management apps include Linnworks, Stocky, and SkuVault Core.
To browse and install apps, go to your Shopify admin dashboard and click on “Apps,” then “Visit the Shopify App Store.”
Choose the apps that best meet your needs and follow the installation instructions provided through the app store.
By installing useful Shopify apps, you can enhance your ecommerce store’s functionality and improve your overall business operations, leading to increased sales and customer satisfaction.
Step 10: Launch your store
Once you’ve completed the steps above, you’re ready to launch your Shopify store! To make your store live, go to your Shopify admin dashboard and click on “Online Store.” In the “Themes” section, click on “Actions” and then “Publish” for your chosen theme.
Your store is now live and ready to accept orders from customers!
But launching your store is just the beginning of your ecommerce journey. In order to get sales, you need customers and in order to get customers, you need traffic.
That’s where promotion and brand-building come in.
See Linnworks & Shopify in action
Discover how Linnworks can help you sell better on Shopify.
Step 11: Market, promote, and expand your brand
With your Shopify store now live, it’s time to focus on promoting it to attract customers and drive sales.
Whether you’re starting your own online store or adding a Shopify store to your existing business, it’s going to require some time and a lot of elbow grease if you want a piece of the competitive ecommerce pie.
If you have no clue where to start, we’d recommend picking up the book Traction: How Any Startup Can Achieve Explosive Customer Growth.
It takes a scientific, logical approach to marketing and brand-building that’s totally trend-agnostic and cuts through all the unnecessary noise. Essentially, you make a list of all the potential marketing channels, as unlikely or off-the-wall as they may be (even things like outdoor advertising, radio, viral marketing, etc.). Then, you commit to running short, comprehensive experiments on each of these channels to see which ones actually move the needle for your business.
As you make your way down the list, you’ll likely discover 2-3 highly profitable channels that really resonate with your target market and drive sales. You then double down on these channels and focus on them in perpetuity. It’s a simple plan but requires dedication and a lot of work.
Here are some of the most common marketing channels that ecommerce businesses use to find success:
Social media marketing
Social media is one of the most effective ways to promote your store and connect with your audience, especially with a highly-visual business model like ecommerce. With platforms like Instagram, TikTok, Facebook and Pinterest, you can showcase your products and build a loyal following.
To get started with social media marketing, create a content calendar and post consistently. Engage with your followers by responding to comments and direct messages. In addition to creating a content calendar and posting consistently, it’s important to know your target audience and the platforms they use.
For example, if your store sells products for a younger demographic, you may want to focus on platforms like TikTok or Instagram Reels.
Older audiences (often with more buying power) may respond better to Facebook ads or Google Ads. The main takeaway is to test everything and refine your marketing efforts based on the results of your tests. And make sure you have your Meta pixel ID set up for accurate tracking in any Facebook ad campaigns you run.
It’s also important to use high-quality visuals and engaging captions to capture the attention of potential customers.
Social media is a constantly evolving landscape, so it’s important to stay up-to-date on the latest trends and best practices.
Check out some of these helpful resources for beginners:
- How to Learn Social Media Marketing: 39 Resources for Beginners
- Complete Social Media Marketing Guide for Beginners in 2023
- Beginner’s Guide to Social Media Marketing | Entrepreneur
- The Importance of Social Media for Online Retail Businesses
- What is social commerce and why should it be part of your retail strategy?
- How to Use Social Media to Provide Excellent Customer Service
By leveraging the power of social media, Shopify store owners can effectively reach their target audience and build a strong brand presence online.
Influencer collaborations
Influencer collaborations can be a highly effective marketing strategy for ecommerce businesses looking to reach a wider audience and build their brand.
However, it’s important to choose the right influencers for your brand and collaborate with them in a way that aligns with your business goals.
To get started with influencer collaborations, consider reaching out to influencers in your niche who have a loyal following and engage with their audience regularly.
When collaborating with influencers, make sure to clearly define the terms of the partnership, including the type of content they will create, how they will promote your products and what compensation they will receive.
Be sure to also review the influencer’s content to ensure it aligns with your brand values and messaging.
To learn more about influencer marketing and how to work with influencers, check out The Beginner’s Guide to Influencer Marketing.
And here are some platforms to help you find influencers to collaborate with:
By following these tips and collaborating with the right influencers, you can effectively promote your ecommerce store and attract new customers.
Paid advertising
Paid ads—including Google Ads, Google Shopping, Meta Advantage+ and in-app TikTok Spark Ads—can accelerate Shopify marketing once your organic flywheel spins. If done correctly, it can drive traffic to your website and increase your revenue.
To get started with paid advertising, it’s important to understand the different platforms available and how to optimize your campaigns for success.
Beginner’s guides to paid advertising on Google Ads and Facebook Ads can provide a helpful starting point for those who are new to advertising.
Here are some resources to get you started:
- Online Advertising: A Beginner’s Guide to Paid Marketing Channels
- A Beginner’s Guide To Paid Advertising in 2023 | Brilliant Digital
- A Complete PPC Marketing Guide for Beginners
By using these guides and continuously monitoring and adjusting your campaigns, you can maximize the effectiveness of your paid advertising and reach your target audience.
Content marketing and SEO
Content marketing and search engine optimization (SEO) are essential for driving organic traffic to your store.
By creating high-quality content and optimizing your store for search engines, you can improve your search rankings and attract more visitors.
And while paid traffic will immediately dry up when you “turn off the tap,” SEO is a long-tail strategy – once your site gets on the first page of Google, it usually stays there.
(You’ll have to keep your content fresh and relevant, but that’s a negligible investment of resources compared to dumping money into paid ads.)
Consider starting a blog or creating video content that showcases your products and provides valuable information to your customers. You can also use Shopify Messaging (formerly Shopify Email) to keep those customers engaged once you’ve captured their info.
Invest time and effort in marketing your Shopify store to generate traffic, build your brand and grow your customer base.
With the right marketing strategies, you can achieve success with your new online store.
Related Posts :
- Ecommerce Marketing Ideas: Boost Your Sales
- How to Attract New Customers for Your Ecommerce Business
Final thoughts
Starting a Shopify store might seem like a challenging task, but with this step-by-step guide, we hope you can launch your ecommerce business with confidence.
By carefully choosing your niche and products, setting up your store’s appearance and functionality and implementing effective marketing strategies, you’ll be well on your way to building a successful ecommerce store on Shopify.
Remember that running an online store requires ongoing effort and dedication to provide the best possible shopping experience for your customers and grow your business.
Stay informed about industry trends, listen to customer feedback and continuously optimize your store’s performance to ensure long-term success.
And if you’re looking for a powerful solution to manage your ecommerce business, don’t forget to schedule a live demo of Linnworks‘ solutions or visit the features page. Both Linnworks and SkuVault Core integrate with Shopify, learn more about the integrations here.
Good luck on your ecommerce journey—may your Shopify store thrive all the way through 2025 and beyond!Good luck with your ecommerce journey and here’s to your Shopify store’s success!
Related Posts:
- Shopify vs. Shopify Plus: Ecommerce Platforms Reviewed
- WooCommerce vs. Shopify: Ecommerce Platforms Reviewed
- Magento vs. Shopify: Ecommerce Platforms Reviewed
FAQ
Fulfilled by Shopify (FBS) lets merchants outsource storage, picking, packing and last-mile delivery—similar to Amazon FBA but fully integrated with the Shopify platform.
With this service, Shopify takes care of everything from receiving the order to shipping it out to the customer.
This allows store owners to focus on other aspects of their business, such as marketing and product development, without worrying about the logistics of order fulfillment.
The service includes features like inventory management, order tracking and shipping rates, making it an efficient and convenient option for many ecommerce businesses.
A sales channel is any platform—online or offline—where you list and sell products, such as your Shopify storefront, social media shops, or a physical pop-up.
Examples of sales channels include your online store, social media platforms like Facebook and Instagram, marketplaces like Amazon and eBay and even brick-and-mortar stores where you might use Shopify POS.
Shopify allows you to easily manage and sell through multiple sales channels in one place.
Shopify offers a variety of shipping options and integrations with major carriers like UPS, FedEx and USPS.
You can set up shipping rates based on weight, price, or destination and even offer free shipping for certain orders.
You can also use Shopify Shipping to purchase and print shipping labels directly from your Shopify account.
Shopify automatically calculates and collects sales taxes based on your store’s location and the location of your customers.
You can also set up tax rates for different regions and countries to ensure that you’re collecting the correct amount of tax on each sale.
Running a successful ecommerce business involves implementing various best practices to ensure that your customers are happy and your operations are efficient. Here are some key best practices to keep in mind:
Prioritize customer experience
Providing a positive experience for your customers is crucial for building loyalty and driving sales. This includes things like clear and accurate product descriptions, fast and reliable shipping and responsive customer service.
Optimize for mobile
More and more customers are shopping on their mobile devices, so it’s important to make sure your ecommerce site is optimized for mobile use. This means ensuring that your site is responsive and easy to navigate on smaller screens.
Use multiple sales channels
Selling your products on multiple sales channels, such as your own ecommerce site, social media platforms and marketplaces like Amazon and eBay, can help increase your reach and drive sales.
Offer free shipping
Many customers expect free shipping when shopping online, so offering this can be a great way to incentivize purchases and increase conversions. If offering free shipping isn’t feasible, consider offering it for orders over a certain threshold.
Monitor and optimize your site’s performance
Regularly monitoring and optimizing your site’s performance can help ensure that it loads quickly, is easy to navigate and is optimized for search engines.
Stay on top of sales taxes
Understanding and properly collecting sales taxes is essential for any ecommerce business. Make sure you know the sales tax laws in your state and any states where you have a physical presence.
By implementing these best practices and staying on top of industry trends, you can help ensure the success of your ecommerce business. Check out Shopify Academy for more learning resources or Shopify Capital if you need funding to grow.
Dropshipping is a business model where you sell products without holding inventory. Instead, you work with a supplier who fulfills orders on your behalf. This can be a great option for those who want to start an ecommerce business without the financial risk of investing in inventory upfront.
Shopify offers integrations with several dropshipping apps, such as Oberlo and Spocket, that allow you to easily add products to your store and fulfill orders through a third-party supplier.
These apps connect you with suppliers and manufacturers around the world, making it easy to find and sell products in your niche.
When starting a dropshipping business with Shopify, it’s essential to research your niche and identify products that will sell well. You’ll also need to build a strong relationship with your supplier to ensure timely and reliable order fulfillment.
In addition, you’ll need to consider shipping times and costs to provide a positive experience for your customers. Shopify’s shipping tools can help you manage shipping rates and create shipping labels with ease.
Overall, dropshipping can be a lucrative and low-risk way to start an ecommerce business with Shopify. By leveraging the platform’s integrations and features, you can quickly and easily launch a successful online store.