
How to Sell from Facebook in 2023: Benefits + Ways to Sell on the Platform
Remember the days when Facebook was just a simple social media platform?
Now, it’s a haven for ecommerce sellers and advertisers.
With over 2.9 billion monthly active users, it’s no surprise that Facebook (now Meta) has become a go-to platform for businesses looking to reach a wider audience.
In this article, we’ll explore the benefits of selling on Facebook and provide tips on how to sell effectively on the platform.
We’ll also walk you through, step-by-step, how to set up your Facebook Shop and use the Facebook ecosystem to reach your target market.
Let’s jump in.
Benefits of Selling on Facebook
Here are some of the benefits ecommerce sellers can enjoy when they expand their strategy to Facebook.
Use of Facebook’s user-friendly interface
A big benefit to businesses that sell on Facebook is the platform’s user-friendly interface.
Facebook has made it easy for businesses to set up a shop and start selling quickly.
The platform provides a variety of tools and features to help businesses manage their products, orders and payments.
Additionally, Facebook provides businesses with insights into their shop’s performance, which can help them make informed decisions about their sales strategy.
Take advantage of Facebook’s advertising tools
Facebook’s advertising tools are some of the best in the world and can be a huge asset to businesses looking to sell on the platform.
Facebook’s targeted advertising capabilities allow businesses to reach laser-specific audiences with their ads.
By targeting users based on demographics, interests and behaviors, businesses can create highly effective ads that are more likely to convert.
Additionally, Facebook’s retargeting capabilities allow businesses to target users who have already shown interest in their products, increasing the likelihood of a sale.
Easily manage customer interactions
Facebook is built for community.
This means Facebook is an excellent sales channel for easy communication with your prospects and customers.
Facebook provides a variety of tools to help businesses communicate with customers, including Messenger and comments.
By responding to customer inquiries and feedback quickly and effectively, businesses can build trust with their customers and create a positive reputation for their brand.
Setting Up Your Storefront
Before you start selling on Facebook, you need to set up your storefront. This involves:
- Creating a Facebook Business Page or using an existing one,
- Adding products to your page,
- Setting up promotions,
- And configuring payment options.
Let’s dig into each of those in more detail.
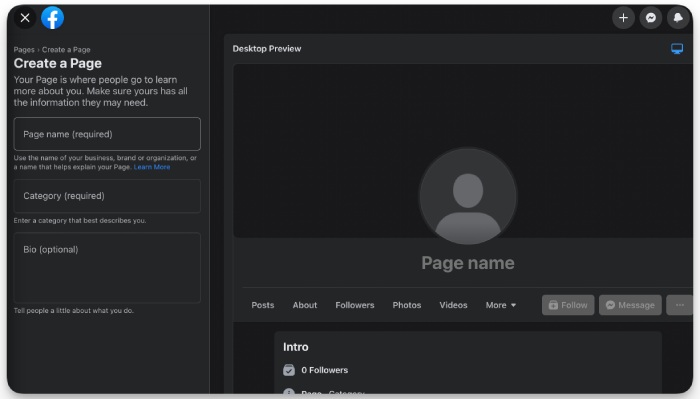
Create a Facebook Business Page or use an existing one
The first step in setting up your storefront is to create a Facebook Business Page.
If you already have one, you can skip this step.
Creating a Business Page is easy and free. Here’s how to do it:
- Log in to your personal Facebook account
- Click on the plus sign (+) in the top right corner of the screen
- Select “Page” from the dropdown menu
- Follow the prompts to fill in your business information, such as your business name, category and description
You’ll also want to include a cover photo and profile picture for your business (usually some variation of your brand name or logo).
If you don’t have one yet, you can use a free service like Canva to create one.
Once you have created your Business Page, you can start adding products to it.
Add products to your Business Page
From here, you can choose to add an Action button that sends users straight to your own website.
Or, if you’d like to sell from your Facebook page directly, you can open up a Facebook Shop.
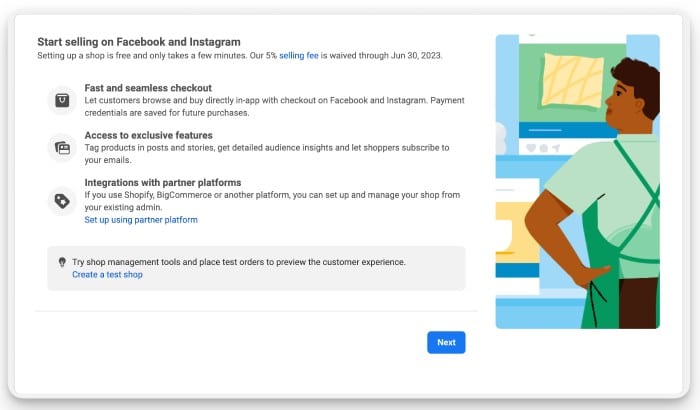
Start by going to the Meta Commerce Manager page and follow the prompts to create a Facebook Shop.
A full tutorial for setting up a shop and adding products goes beyond the scope of this blog post, but you can view this comprehensive quickstart guide from Meta itself on how to create a shop and add products.
Before you can add products, Facebook may prompt you to create a Business Manager Account. This will include your business contact information as well as bank account details for processing payouts.
Once you’ve added at least one product to your online store, you’ll be prompted to configure shipping rates, your return window, your customer service email address and more.
Configure payment options
Once you’ve finalized your product catalog and business details, you’ll be automatically prompted to set up your payment details.
The setup wizard will prompt you for information in five different categories:
- Overview
- Business type
- Business address
- Business category
- Bank account
Once you have set up your payment information, make sure to test it to ensure that it is functioning correctly. You can do this by placing a test order and checking that the payment is processed and received by your account.
It’s important to offer multiple payment methods to make it easier for customers to purchase from your Facebook store. In addition to credit cards, you may want to consider offering payment options like PayPal, Apple Pay, or Google Pay.
By configuring your payment options properly, you can provide a seamless shopping experience for your customers, which will ultimately lead to higher conversion rates and more sales.
Navigating the Meta Commerce Manager Dashboard
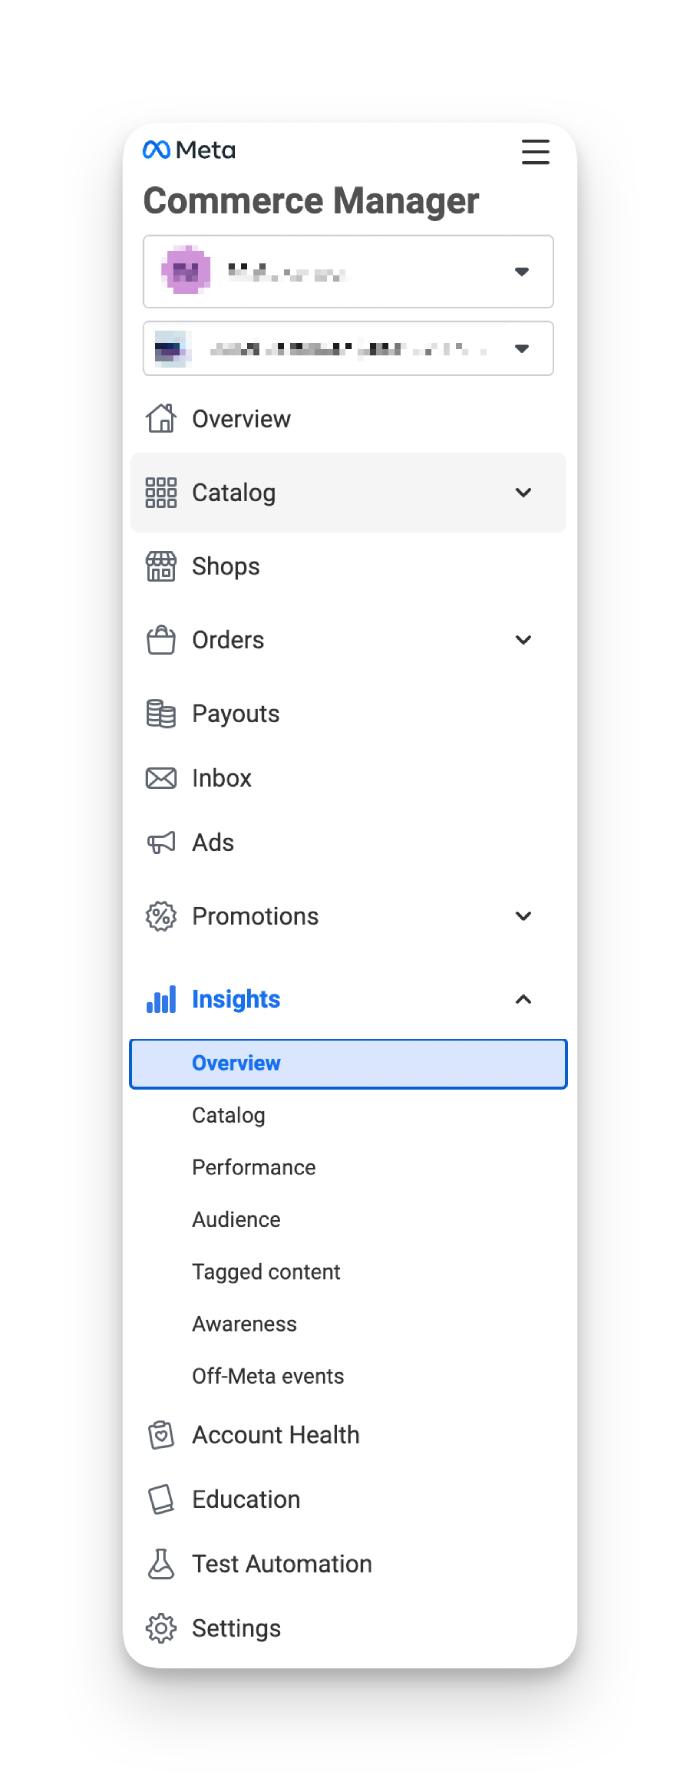
Once you’ve completed the setup wizard, you’ll be greeted with a familiar dashboard (especially if you’ve ever used an ecommerce platform).
The Meta Commerce Manager dashboard includes everything you need to edit products, create promotions, get analytics insights into your shop performance and test automation.
You’ll likely be prompted to verify your business and customize your shop before your marketplace listing is active. Note that there is a manual review period conducted by Meta before you’re able to sell on Facebook.
Making your products visible and purchasable on Facebook marketplace
One thing you’ll want to make sure you have configured is the visibility of your products.
Otherwise, they won’t show up in the Facebook Marketplace and users won’t have the ability to utilize Facebook Checkout (purchasing straight from the Facebook app or page).
To fix this, follow these instructions:
- On your Meta Commerce Manager dashboard, click “Settings” in the bottom-left corner
- From here, click “Business assets” and make sure your page is set to “Visible”
- Then, select “Connect” under marketplace and follow the prompts until you can select “Enable marketplace.”
Congrats! Facebook users can now purchase your products without leaving the platform.
Getting your Facebook Shop in front of customers
You’ve set up your Facebook Shop, stocked it with attractive products and now you’re ready to reach customers. But how can you get the word out and drive traffic to your online store?
Here are some creative ways to ensure your Facebook Shop gets in front of potential customers and keeps them coming back for more.
1. Invite Friends and Family
Begin by inviting friends and family to like and follow your shop. Encourage them to share your page with their network, helping you reach a wider audience.
2. Use Facebook Groups
Join relevant Facebook Groups in your niche or industry and actively participate in discussions. Share your knowledge and expertise and when appropriate, mention your Facebook Shop and how it might benefit the group’s members.
Facebook Groups often contain the most die-hard and knowledgeable fans of a particular niche. Whatever you’re selling, it’s a best practice to join all Facebook groups in that vertical.
Just be careful to abide by the group rules and not be overly spammy, or you may find yourself burning valuable bridges and relational capital.
3. Collaborate with Influencers
Partner with influencers in your industry to promote your Facebook Shop. Offer them exclusive discounts or freebies in exchange for them sharing your store with their audience.
4. Host a Facebook Live Event
Hosting a Facebook Live event can be a fun and engaging way to showcase your products. Offer a virtual tour of your shop, share behind-the-scenes stories and answer questions from viewers to build rapport with potential customers.
5. Offer Exclusive Deals and Discounts
Create limited-time offers, flash sales, or exclusive discounts for your Facebook followers. This incentivizes people to follow your shop and encourages them to share the deals with their friends.
6. Engage with Your Followers
Be responsive to comments, messages and reviews from your customers. Engage with them by asking questions, hosting polls and sharing user-generated content to create a sense of community around your brand.
7. Run Facebook Ads
Target your ideal customer base by running Facebook Ads that promote your shop. Use eye-catching visuals and compelling ad copy to entice users to click through to your store.
8. Cross-Promote on Other Social Media Platforms
Promote your Facebook Shop on other social media platforms like Instagram, Twitter, or Pinterest. Share enticing images and videos of your products and include a call-to-action directing users to your Facebook Shop.
9. Organize Giveaways and Contests
Host a giveaway or contest on your Facebook page, asking participants to like, share, or tag friends in the post. This helps you reach new potential customers and encourages engagement with your brand.
10. Use Hashtags Strategically
Incorporate relevant and popular hashtags in your Facebook Shop posts to increase their visibility. Research trending hashtags in your industry and use them to attract users searching for those topics.
Monitoring the Performance of Your Product Listings
One of the most important aspects of running a Facebook storefront is monitoring the performance of your product listings.
Thankfully, Facebook provides a rich suite of analytics tools to make this as easy as possible.
These reports allow you to identify which products are performing well and which ones need improvement.
Here are some tips for monitoring the performance of your product listings:
Track Views, Clicks and Conversions
Facebook’s Page Insights tool provides data on the performance of your page and its content.
You can use this tool to track the number of views, clicks and conversions your product listings are receiving.
This data can help you identify which products are attracting the most interest from potential customers and adjust your inventory accordingly.
Identify Best-Selling Products and Adjust Inventory Accordingly
In addition to tracking views, clicks and conversions, you can also use Facebook’s analytics tools to identify your best-selling products.
By analyzing this data, you can adjust your inventory to ensure that you’re always stocked up on your most popular items
This can help you maximize sales and avoid running out of stock on high-demand items.
Measure the Success of Promotions
Promotions are a great way to drive sales and attract new customers to your Facebook storefront
However, it’s important to measure the success of your promotions to ensure that you’re getting a good return on your investment. Here are some tips for measuring the success of your promotions:
Analyze the Impact of Discounts and Special Offers on Sales
Facebook’s Ads Manager tool provides data on the performance of your ad campaigns, including the impact of discounts and special offers on sales.
By analyzing this data, you can determine which types of promotions are most effective for your business and adjust your strategy accordingly.
Optimize Promotions Based on Data-Driven Insights
In addition to analyzing the impact of promotions on sales, you can also use Facebook’s analytics tools to optimize your promotions based on data-driven insights.
For example, if you find that a certain type of promotion is particularly effective, you can adjust your budget and targeting to maximize its impact.
Adjust Content Based on Analytics
Finally, it’s important to adjust your content strategy based on analytics to ensure that you’re engaging your audience effectively.
This should go without saying, but if you’re going to be on Facebook, you need a content strategy. Spamming your Facebook Page Shop with your product listings over and over won’t get you very far.
Here are some tips for adjusting your content strategy based on analytics:
Identify Top-Performing Content Types and Formats
Facebook’s Page Insights tool can help you identify which types of content are performing well on your page.
For example, you might find that video content is getting more engagement than static images, or that certain types of posts are attracting more comments and shares than others.
By analyzing this data, you can adjust your content strategy to focus on the types of content that are resonating most with your audience.
Tailor Your Content Strategy to Suit Your Audience
In addition to identifying top-performing content types and formats, you can also use Facebook’s analytics tools to get insights into your audience’s demographics and interests.
This data can help you tailor your content strategy to suit your audience more effectively.
For example, if you find that your audience is primarily interested in fitness and wellness products, you can adjust your content strategy to focus more on these types of products.
Level up your Customer Communication with Messenger
Enabling Facebook Messenger on your business page can be a game-changer in terms of customer communication and engagement.
By integrating Messenger with your Facebook Business Page, you can use the platform to offer personalized product recommendations and answer customer inquiries in real time.
Here are some steps to enable Facebook Messenger and use it to enhance your customer interactions:
Integrate Messenger with your Facebook Business Page
The first step is to integrate Messenger with your Facebook Business Page. Follow these steps:
- Log in to your Facebook account and go to your Business Page.
- Click on “Settings” in the top right corner of the page.
- Click on “Messaging” in the left-hand menu.
- In the “Messaging” section, you will see an option to “Add Messenger to your website.” Click on this option.
- Follow the prompts to set up Messenger on your page.
- Once Messenger is set up, you can start using it to communicate with customers.
Activate Messenger settings within your Page
Once you have integrated Messenger with your Facebook Business Page, you need to activate the Messenger settings within your Page.
This will allow you to receive and respond to messages from customers. Here’s how to activate Messenger settings:
- Go to your Business Page and click on “Settings” in the top right corner.
- Click on “Messaging” in the left-hand menu.
- In the “Messaging” section, you will see an option to “Turn On Messenger.” Click on this option.
- You can also choose to set up an “Away” message for when you are not available to respond to messages.
Customize automated messages and responses
Facebook Messenger allows you to set up automated messages and responses, which can help you save time and improve customer communication.
Here’s how to customize your Messenger messages and responses:
- Go to your Business Page and click on “Settings” in the top right corner.
- Click on “Messaging” in the left-hand menu.
- In the “Messaging” section, you will see options to customize your automated messages and responses.
- You can set up an automated greeting message to welcome customers when they message you.
- You can also set up quick replies to common customer inquiries to save time.
- Finally, you can customize your away message to let customers know when you will be available to respond to messages.
Use Messenger to enhance customer interactions
Once you have Messenger set up and customized, you can start using it to enhance your customer interactions. Here are some tips for using Messenger effectively:
Offer personalized product recommendations
When customers message you on Messenger, take the opportunity to offer personalized product recommendations based on their interests and needs.
You can use Facebook’s analytics tools to get insights into your audience’s demographics and interests, which can help you tailor your product recommendations more effectively.
Answer customer inquiries in real-time
One of the benefits of using Messenger is that it allows you to answer customer inquiries in real time.
This can help you build trust and credibility with your customers, as well as improve your customer service.
Final thoughts
In conclusion, Facebook is a versatile platform that offers a range of options for businesses to sell their products online.
There are so many ways for ecommerce sellers to get a piece of the Facebook pie and further diversify their sales channels.
Between Facebook Marketplace, Facebook Shops, Buy and Sell Groups and syncing with an ecommerce platform, businesses have multiple ways to reach potential customers and grow their sales.
By creating compelling product listings, using Facebook’s advertising tools and engaging with customers through comments and messages, businesses can optimize their presence on the platform.
Additionally, integrating Facebook Messenger with their business page can provide an additional avenue for personalized customer interactions.
Overall, Facebook provides businesses with a robust and accessible platform to reach their target audience and increase their sales potential.
Good luck and happy selling!
Looking for more resources on Facebook and other social channels?
Check out our other posts: